ラジオボタンのオンオフ
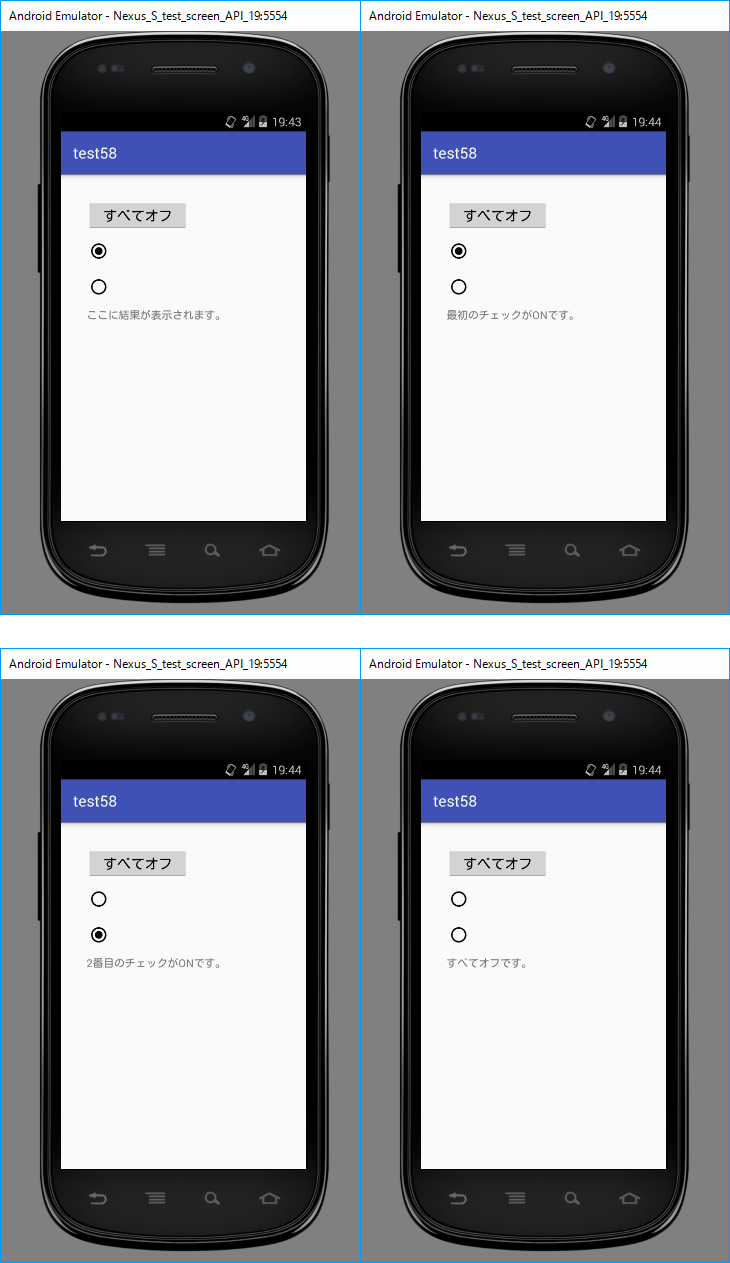
ラジオボタンのオンおよびオフを取得、設定するサンプルです。

package com.example.test.test58;
import android.support.v7.app.AppCompatActivity;
import android.os.Bundle;
import android.util.Log;
import android.view.View;
import android.widget.CheckBox;
import android.widget.RadioButton;
import android.widget.RelativeLayout;
//TextViewを使用する宣言
import android.widget.TextView;
//クリックイベント用に追加
import android.view.View.OnClickListener;
//ボタンを宣言
import android.widget.Button;
public class MainActivity extends AppCompatActivity implements OnClickListener {
//setId用の管理番号
private int mNo1;
private int mNo2;
private int mNo3;
private int mNo4;
@Override
protected void onCreate(Bundle savedInstanceState) {
super.onCreate(savedInstanceState);
//setContentView(R.layout.activity_main);
RelativeLayout layout = new RelativeLayout(this);
setContentView(layout);
//座標の初期設定
int x=0;
int y=0;
int width=0;
int height=0;
//配置を設定
RelativeLayout.LayoutParams obj1 = null;
mNo1 = View.generateViewId();
mNo2 = View.generateViewId();
mNo3 = View.generateViewId();
mNo4 = View.generateViewId();
x=50;
y=50;
height=60;
//ボタンの設置
width=200;
obj1=getLayoutObject(width, height);
obj1.leftMargin=x;
obj1.topMargin=y;
Button btn1=new Button(this);
btn1.setId(mNo4);
btn1.setOnClickListener(this);
btn1.setText("すべてオフ");
layout.addView(btn1,obj1);
btn1=null;
y+=height+10;
width=50;
//チェックボックス1
obj1=getLayoutObject(width, height);
obj1.leftMargin=x;
obj1.topMargin=y;
RadioButton radioButton1 = new RadioButton(this);
radioButton1.setId(mNo1);
radioButton1.setChecked(true);
radioButton1.setOnClickListener(this);
layout.addView(radioButton1,obj1);
radioButton1=null;
y+=height+10;
//チェックボックス2
obj1=getLayoutObject(width, height);
obj1.leftMargin=x;
obj1.topMargin=y;
RadioButton radioButton2 = new RadioButton(this);
radioButton2.setId(mNo2);
radioButton2.setChecked(false);
radioButton2.setOnClickListener(this);
layout.addView(radioButton2,obj1);
radioButton2=null;
y+=height+10;
//ラベルを設置
width=300;
obj1 = getLayoutObject(width, height);
obj1.leftMargin=x;
obj1.topMargin=y;
TextView textView=new TextView(this);
textView.setId(mNo3);
textView.setText("ここに結果が表示されます。");
layout.addView(textView, obj1);
textView=null;
}
@Override
//ボタンがクリックされたら実行されます。
public void onClick(View view) {
int iResult = 0;
int iViewId=0;
iViewId=view.getId();
if(iViewId==mNo1)
{
iResult = judgeRadioButton(1);
}
else if(iViewId==mNo2)
{
iResult = judgeRadioButton(2);
}
else if(iViewId==mNo4)
{
clearRadioButton();
}
if(iResult>0)
{
setTextViewText(iResult);
}
}
private void clearRadioButton()
{
RadioButton radioButton1=(RadioButton)findViewById(mNo1);
RadioButton radioButton2=(RadioButton)findViewById(mNo2);
radioButton1.setChecked(false);
radioButton2.setChecked(false);
setTextViewText(0);
}
private int judgeRadioButton(int iCheckBox)
{
//int iResult = 0;
boolean checked1=false;
boolean checked2=false;
RadioButton radioButton1=(RadioButton)findViewById(mNo1);
RadioButton radioButton2=(RadioButton)findViewById(mNo2);
checked1=radioButton1.isChecked();
checked2=radioButton2.isChecked();
if(iCheckBox==1)
{
radioButton1.setChecked(true);
radioButton2.setChecked(false);
}
else
{
radioButton1.setChecked(false);
radioButton2.setChecked(true);
}
radioButton1=null;
radioButton2=null;
return iCheckBox;
}
private void setTextViewText(int iResult)
{
String sData = "";
if(iResult==1)
{
sData="最初のチェックがONです。";
}
else if(iResult==2)
{
sData="2番目のチェックがONです。";
}
else
{
sData="すべてオフです。";
}
TextView textView=(TextView)findViewById(mNo3);
textView.setText(sData);
textView=null;
}
//レイアウトを決定するオブジェクトを生成し渡します
private RelativeLayout.LayoutParams getLayoutObject(int width,int height)
{
return new RelativeLayout.LayoutParams(width, height);
}
}
|
ラジオボタンのチェック状況はisCheckedで取得できます。
また、チェックのオンオフはsetCheckedで設定できます。
オンにするにはtrue、オフにするにはfalseを設定します。
すべてクリアするには、このサンプルでは両方のラジオボタンに
setChekedでfalseを設定しています。
実行結果

|
|